 HOME
HOME Post Messages
|
HOME |
|
|
Post Messages |
Even the function is not so rich as the developing pace of Sather is slow, it is many enough to make typical GUI applications. The performance of Sather/Tk is much better than those of Tcl/Tk or Python/Tk because the code of Sather/Tk is compiled to a native code through a C code.
You can find demo scripts under $SATHER_HOME/Library/System/Gui/Demos. On the 2nd page of Doc.fmk.ps, you can find a table of program names and class names of the main function. For instance, you can compile pizza.sa like:
sacomp -gui -main PIZZA_MAIN -o pizza pizza.saYou need the -gui flag to compile a GUI program. The executable is produced even many warnings appear during compilation. When you run pizza, a widget shown in Fig. 1 appears. It calculates pizza prices when you select the type, size and topping.
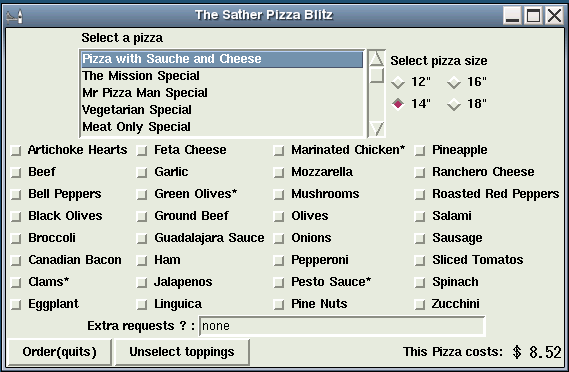
Figure 1: The widget of pizza.
Hello World!program.
[code 1]: tkhello.sa
01:     -- a simple Tk hello world.
02:
03:     class MAIN is
04:        include GUI_UTIL;  -- include it and then just define init to write a GUI program
05:
06:        init is
07:           label::=#TK_LABEL(root_window,TK_LABEL_CFG::std.text("Hello World!")); -- explained in later section /span>
08:        end;
09:     end;
Compile and execute then you get a widget like Fig. 2.
$ sacomp -gui tkhello.sa -o tkhello
$ ./tkhello

Figure 2. A simple Hello World written in Sather/Tk.
| Method or Variables | Explanation |
|---|---|
| (stab) init | You should write it by yourself. |
| root_window | The top level widget. |
| packer | to pack widgets. same as TK_PACK::create. |
| quit_routine | a ROUT to terminate |
| main | You do not have to touch it usually. |
| startup_gui | to make widgets. seldom used. |
| gui_loop | to wait events seldom used. |
Figure 3 shows a label with a button.
By pressing a TOGGLE
button, the text color and the background are toggled.
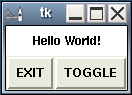
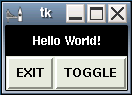
Fig. 3. Another Hello World. The text color and the background are toggled by pressing a toggle button.
01: -- a simple Tk hello world with toggle button. 02: 03: class MAIN is 04: include GUI_UTIL; 05: 06: private attr label:TK_LABEL; -- TheHello Worldlabel. 07: private attr label_config:TK_LABEL_CFG; -- An instance of the label configuring class. 08: private attr black_foreground:BOOL; -- true if black text 09: 10: toggle is -- to toggle black and white 11: if black_foreground then 12: label.configure(label_config.foreground("white").background("black")); -- use the configure method to alter the configuration 13: black_foreground:=false; 14: else 15: label.configure(label_config.foreground("black").background("white")); 16: black_foreground:=true; 17: end; 18: end; 19: 20: init is -- initializing method 21: label_config:=#; 22: label:=#(root_window, 23: label_config.text("Hello World!").padx(6.0).pady(6.0).foreground("black").background("white"), 24: packer.top_grow_horiz_n_vert.anchor(TK_ANCHOR::center)); 25: frame::=#TK_FRAME(root_window, packer.bot); 26: 27: button1::=#TK_BUTTON(frame, 28: TK_BUTTON_CFG::std.text("EXIT").padx(6.0).pady(6.0), 29: packer.left); 30: button1.command(quit_routine); 31: 32: button2::=#TK_BUTTON(frame, 33: TK_BUTTON_CFG::std.text("TOGGLE").padx(6.0).pady(6.0), 34: packer.right); 35: button2.command(bind(toggle)); 36: black_foreground:=true; 37: end; 38: end;
The TK_PACK class has methods shown in Table 2.
| Method | Explanation |
|---|---|
| top | to place on top of. |
| top_grow_horiz | to place on top and expand horizontally |
| top_grow_horiz_n_vert | to place on top and expand horizontally and vertically |
| top_n_grow_vert | to place on top and expand vertically |
| bot | to place on bottom |
| bot_grow_horiz | to place on bottom and expand horizontally |
| bot_grow_horiz_n_vert | to place on bottom and expand horizontally and vertically |
| bot_n_grow_vert | to place on bottom and expand vertically |
| left | to place left side. |
| left_grow_vert | to place left side and expand vertically |
| left_grow_vert_n_horiz | to place left side and expand horizontally and vertically |
| left_n_grow_horiz | to place left side and expand horizontally |
| right | to place right side. |
| right_grow_vert | to place right side and expand vertically |
| right_grow_vert_n_horiz | to place right side and expand horizontally and vertically |
| right_n_grow_horiz | to place right side and expand horizontally and vertically |
| external_padding(x, y:FLT) | to configure the margin |
| internal_padding(x, y:FLT) | to configure the paddings. |
| anchor(a:TK_ANCHOR) | to fine tune the position |
| Method | Explanation |
|---|---|
| center | to put in the center |
| n | to put on top |
| nw | to put at top-left |
| w | to put left side |
| sw | bottom-left |
| s | bottom |
| se | bottom right |
| e | right |
| ne | top right |
For instance, the label created by [code 2] expand horizontally and vertically and
the text (Hello World
) is always placed in the center as shown in Fig. .4.
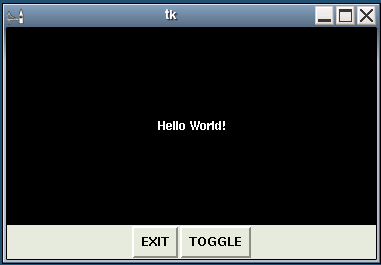
Figure 4. The Hello World
widget after expansion.
Hello Worldwidget with radio buttons (see also [code 3]). You can select the text color and background color using the radio buttons.
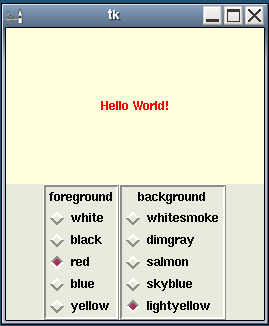
Figure 5. The Hello World
program with radio buttons.
You can select the text color and the background color by the radio buttons.
[code 3]
01:     -- a simple Tk hello world with radio buttons.
02:
03:     class MAIN is
04:        include GUI_UTIL;
05:
06:        private const fgcolors:ARRAY{STR}:=|"white","black", "red", "blue", "yellow"|;                     -- text color
07:        private const bgcolors:ARRAY{STR}:=|"whitesmoke", "dimgray", "salmon", "skyblue", "lightyellow"|;  -- background color
08:        private attr label:TK_LABEL;
09:        private attr label_config:TK_LABEL_CFG;
10:        private attr fg:TK_VAR;
11:        private attr bg:TK_VAR;
12:
13:        config_label is
14:           label.configure(label_config.foreground(fg.query).background(bg.query));
15:        end;
16:
17:        rbuttons(name:STR, colors:ARRAY{STR}, fr:TK_FRAME, v:TK_VAR, default:STR) is  -- The method to make a set of radio buttons.
18:           s:STR;
19:           r::=#TK_LABEL(fr, TK_LABEL_CFG::std.text(name), packer.top);
20:           loop
21:     	 s:=colors.elt!;
22:     	 b::=#TK_RADIO(fr,
23:     		       TK_RADIO_CFG::std.text(s).variable(v).val(s),
24:     		       packer.top.anchor(TK_ANCHOR::w));
25:     	 b.command(bind(config_label));
26:     	 if s=default then b.select; end;                                    -- set the default button
27:           end;
28:        end;
29:
30:
31:        init is
32:           label_config:=#;
33:           fg:=#;
34:           bg:=#;
35:           label:=#(root_window,
36:     	       label_config.text("Hello World!").padx(6.0).pady(6.0).foreground("black").background("white"),
37:     	       packer.top_grow_horiz_n_vert.anchor(TK_ANCHOR::center));
38:           frame::=#TK_FRAME(root_window, packer.bot);
39:
40:           -- creating radio buttons
41:           fconfig:TK_FRAME_CFG:=TK_FRAME_CFG::std.borderwidth(3.0).relief_ridge;
42:           rbuttons("foreground", fgcolors, #TK_FRAME(frame, fconfig, packer.left), fg, "black");   -- making a set of radio buttons for text color
43:           rbuttons("background", bgcolors, #TK_FRAME(frame, fconfig, packer.right), bg, "whitesmoke"); -- for the background
44:        end;
45:     end;
Hello Worldprogram
Hello Worldstring moves to the position at mouse left click. In addition, the text color turns red when the mouse is on the string.
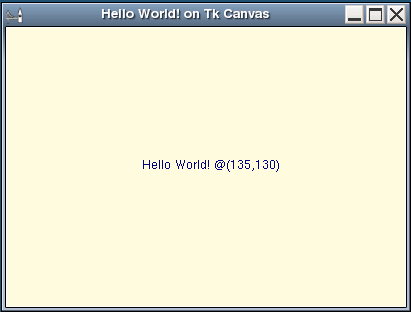
Figure 6. Hello World
with TK_CANVAS.
The string moves to the position where the mouse left clicked.
[code 4] canvas_hello.sa
01:     -- a simple Tk hello world with Tk canvas
02:
03:     class MAIN is
04:        include GUI_UTIL;
05:
06:        private attr cvs:TK_CANVAS;
07:        private attr tag:TK_CANVAS_TAG;
08:        private attr atag:ARRAY{TK_CANVAS_TAG};
09:
10:        mv(a:TK_EVENT_INFO) is                          -- moving the text by mouse left click
11:           cvs.delete(tag);                             -- deleting the original text
12:           x,y:INT;
13:           a.mouse_coordinates(out x, out y);           -- getting mouse position
14:           cvs.draw_text("Hello World! @(" + x + "," + y + ")",
15:     		    x.flt, y.flt, atag, TK_CTEXT_CFG::std.fill("navy"));   -- showing the new text there.
16:        end;
17:
18:        rd(a:TK_EVENT_INFO) is
19:           cvs.text_configure(tag, TK_CTEXT_CFG::std.fill("red"));  -- turning the text color red
20:        end;
21:
22:        nv(a:TK_EVENT_INFO) is
23:           cvs.text_configure(tag, TK_CTEXT_CFG::std.fill("navy"));  -- turning the text color navy
24:        end;
25:
26:        init is
27:           dummy:$OB:=void;       -- it is required to show the title on the title bar
28:           TK_WINDOW_MGR::title(root_window, "Hello World! on Tk Canvas");   -- showing the title on the title bar
29:           tag:=#;
30:           atag:=#(|tag|);
31:           cvs:=#(root_window,                  -- creating a canvas without scroll bars
32:     	     TK_CANVAS_CFG::std.background("cornsilk").hscroll(false).vscroll(false).scroll_region(0.0,0.0,200.0,200.0));
33:           cvs.draw_text("Hello World! @(100.0,100.0)", 100.0, 100.0, atag,TK_CTEXT_CFG::std.fill("navy"));  -- to draw Hello World at (100,100)
34:           cvs.bind_event(TK_BUTTON_EVENT::B1, bind(mv(_)));  -- mv is called by mouse left click
35:           cvs.bind_event(TK_EVENT::Widget_enter, tag, bind(rd(_)));  -- rd is called when mouse is on the string
36:           cvs.bind_event(TK_EVENT::Leave, tag, bind(nv(_)));  -- nv is called when mouse leave the string
37:        end;
38:     end;
| Object | Config Classes |
|---|---|
| line | TK_LINE_CFG |
| ellipse | TK_OVAL_CFG |
| polygon | TK_POLY_CFG |
| rectangle | TK_RECT_CFG |
| string | TK_CTEXT_CFG |
| window | TK_CWIND_CFG |
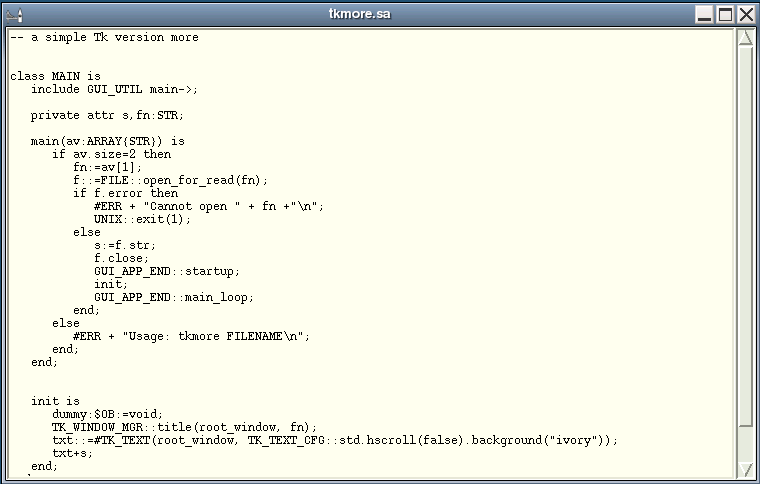
Figure 7. Showing file contents using TK_TEXT.
[code 5] tkmore.sa
01:     -- a simple Tk version more
02:
03:     class MAIN is
04:        include GUI_UTIL main->;
05:
06:        private attr s,fn:STR;
07:
08:        main(av:ARRAY{STR}) is        -- modify main to have arguments
09:           if av.size=2 then
10:     	 fn:=av[1];              -- open the file whose name is given by av[1]
11:     	 f::=FILE::open_for_read(fn);
12:     	 if f.error then
13:     	    #ERR + "Cannot open " + fn +"\n";
14:     	    UNIX::exit(1);
15:     	 else
16:     	    s:=f.str;            -- read the contents
17:     	    f.close;             -- and close it
18:     	    GUI_APP_END::startup;
19:     	    init;
20:     	    GUI_APP_END::main_loop;
21:     	 end;
22:           else
23:     	 #ERR + "Usage: tkmore FILENAME\n";
24:           end;
25:        end;
26:
27:        init is
28:           dummy:$OB:=void;
29:           TK_WINDOW_MGR::title(root_window, fn);     -- show the title on the title bar
30:           txt::=#TK_TEXT(root_window, TK_TEXT_CFG::std.hscroll(false).background("ivory")); -- making TK_TEXT without horizontal scroll bar
31:           txt+s;   -- use '+' to show the contents
32:        end;
33:     end;
The program is fast and convenient.
$sacomp -gui -o tkmore tkmore.sa
$./tkmore tkmore.sa
Download and play with the code shown in this chapter.
|
HOME |
|
|
Post Messages |