 HOME
HOME 書き込む
書き込む
|
HOME |
書き込む |
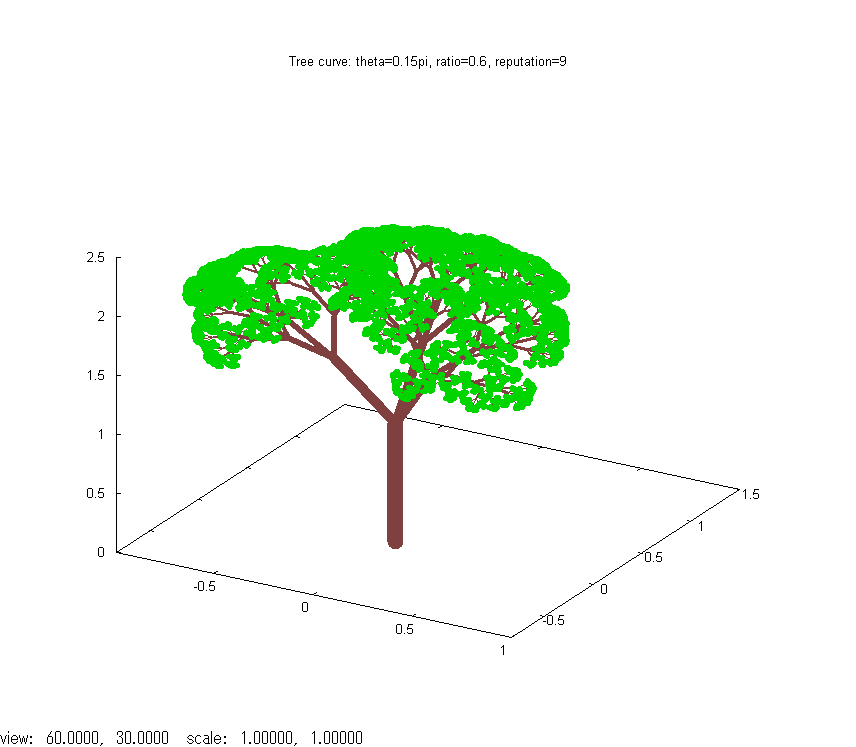
ここではタプルのサブクラスとして Vector クラスを定義してみます。 Python 早めぐりで定義したベクトルは説明用の不完全なものでしたが、 ここでは使えるものを作ってみました。 算術演算を定義する特殊メソッドの使い方を参考にして下さい。 また、Vector クラスを使って3次元のフラクタル木を作ってみました。
さて、Vector クラスは、ベクトルらしく振舞うように代数演算 (+, -, *, +=, -=) を定義します。
[code 1] (vector.py)
 01:     #! /usr/bin/env python
 02:     #  coding: shift_jis
 03:
 04:     import math, copy
 05:
 06:
 07:     ## functions ------------------------------------------------------------
 08:     def isnum(n):
 09:         """ check if n is a number """
 10:         return type(n) in (int, float, long, complex)
 11:
 12:     def make_vector(*ele, **key):
 13:         """ making an instance of Vector"""
 14:         if ele:
 15:             return Vector(ele)
 16:         elif 'value' in key and 'dimension' in key:
 17:             return Vector([key['value'] for x in range(key['dimension'])])
 18:         else:
 19:             raise KeyError, 'Key should be \'dimension\' and \'value\'.'
 20:
 21:
 22:     ## ------------------------------------------------------------------------
 23:     class Vector(tuple):
 24:         """
 25:         Vector is a class for vector operation, which is a sub-class of tuple.
 26:         """
 27:
 28:         def __neg__(self):
 29:             return Vector([-x for x in self])
 30:
 31:         def __pos__(self):
 32:             return copy.copy(self)
 33:
 34:         def __abs__(self):
 35:             """it returns the magnitude of vector."""
 36:             return math.sqrt(sum([ x * x for x in self]))
 37:
 38:         def norm(self):
 39:             """it returns the normarized vector."""
 40:             a = self.__abs__()
 41:             return Vector([x/a for x in self])
 42:
 43:         def __add__(self, a):
 44:             """it adds vector and vector."""
 45:             if isinstance(a, Vector):
 46:                 if len(self) == len(a):
 47:                     return Vector([ x + y for x, y in zip(self, a)])
 48:                 else:
 49:                     raise ValueError, "Same dimension is required."
 50:             else:
 51:                 raise TypeError, "Vector is required."
 52:
 53:         __iadd__ = __add__
 54:
 55:         def __sub__(self, a):
 56:             return self.__add__(-a)
 57:
 58:         __isub__ = __sub__
 59:
 60:         def __mul__(self, m):
 61:             """if m is a vector, it calculate the inner product,
 62:                else if m is a number, it multiplies each element of vector by m."""
 63:
 64:             if isinstance(m, Vector):
 65:                 if len(self) == len(m):
 66:                     return sum([ x * y for x, y in zip(self, m)])
 67:                 else:
 68:                     raise ValueError, "Same dimension is required."
 69:             elif isnum(m):
 70:                 return Vector([ x * m for x in self])
 71:             else:
 72:                 raise TypeError, "Vector or number is required."
 73:
 74:         __rmul__ = __mul__
 75:
 76:         def __str__(self):
 77:             """add#V in front of the representation of tuple."""
 78:             return '#V' + tuple.__str__(self)
 79:
 80:     ##-----------------------------------------------------------------------------
 81:     __all__ = (make_vector, Vector)
 82:
 83:     if __name__ == '__main__':
 84:         v1 = Vector([1,2,3])
 85:         v2 = Vector([2,3,4])
 86:         v3 = Vector([1+2j, 2+3j, 4+5j])
 87:         print 'Vector([1,2,3])  (v1, here in after) = ', v1
 88:         print 'Vector([2,3,4])  (v2, here in after) = ', v2
 89:         print 'Vector([1+2j, 2+3j, 4+5j])     (v3, here in after) = ', v3
 90:         print '-v1 = ', -v1
 91:         print 'v1==v2', v1==v2
 92:         print 'v1[0] =', v1[0]
 93:         print 'v1*v2 = ', v1*v2
 94:         print 'v2-v1 = ', v2 - v1
 95:         print '3*v1 = ', 3*v1
 96:         print 'v1*3 = ', v1*3
 97:         print 'abs(v1) = ', abs(v1)
 98:         print 'v1.norm() = ', v1.norm()
 99:         for i, x  in enumerate(v1):
100:             print 'v1[', i, '] = ', x
101:         v1 += v2
102:         print 'v1 += v2 -> v1', v1
103:         v1 -= v2
104:         print 'v1 -= v2 -> v1', v1
105:         print 'make_vector(1,2,3,4) =', make_vector(1,2,3,4)
106:         print 'make_vector(dimension=5, value=0) =', make_vector(dimension=5, value=0)
107:         print 'v3 + make_vector(dimension=len(v3), value= 1+2j) = ', v3 + make_vector(dimension=len(v3), value= 1+2j)
108:         print 'repr(v1) = ', repr(v1)
109:         print 'str(v1) = ', str(v1)
数値型をエミュレートするメソッドについての詳しいことは Python リファレンスマニュアル 3.3.7 を参照してください。
[code 2] (tree.py)
01:     #! /usr/bin/env python
02:
03:     from vector import make_vector
04:     from math import sin, cos, pi, atan, sqrt
05:     from random import randint
06:
07:
08:     REP = 9
09:     THETA = pi * 0.15
10:     BR = 0.6
11:
12:     def make_branch(br, ratio, theta, phi):
13:         """
14:         bending the vector v (br.v * ratio) by theta,
15:         and turn it around the plane which is perpendicular to v by phi.
16:
17:         A unit vector (x, y, z) on the perpendicular plane is represented by:
18:         ax + by + cz = 0,          (1)
19:         x^2 + y^2 + z^2 =0         (2)
20:         where a=v[0], b=v[1], c=v[2]
21:
22:         from eq (2),  x, y, z  are converted to alpha, phi by
23:         x = sin(alpha)cos(phi)
24:         y = sin(alpha)sin(phi)
25:         z = cos(alpha)              (3)
26:
27:         where 0<= alpha <=pi.
28:
29:         by combining eqs (1) and (3), eq (4) is obtained
30:
31:         tan(alpha) = -c / (a cos(phi) + b sin(phi))   (4)
32:
33:         by calculating x,y, and z using eqs (3) and (4),
34:         a unit vector(v1) perpendicular to v is obtained.
35:
36:         The second step is making two unit vectors say v2, and v3,
37:         which satisfy
38:         v * v2(or v3) = 0
39:         v1 *v2(or v3) = -0.5
40:
41:         Then make a list of Branch from v1, v2, v3,
42:         """
43:
44:         v0 = br.v * ratio
45:         p = (v0[0] * cos(phi) + v0[1] * sin(phi))
46:         alpha = p==0 and 0.5*pi or atan(-v0[2]/p)
47:         if alpha<0:  alpha += pi
48:         v1 = make_vector(sin(alpha)*cos(phi), sin(alpha)*sin(phi), cos(alpha)) # first unit vector perpendicular to v0
49:
50:         # calculating 2nd and 3rd unit vectors perpendicular to v0
51:         t = v0[1]*v1[2] - v0[2]*v1[1]
52:         a = 0.5*v0[2]/t
53:         b = (v0[0]*v1[2]-v0[2]*v1[0])/t
54:         c = -0.5*v0[1]/t
55:         d = -1*(v0[0]*v1[1]-v0[1]*v1[0])/t
56:         a1 = 1+b*b+d*d
57:         b1 = a*b + c*d
58:         c1 = a*a + c*c -1
59:         d1 = b1*b1 - a1*c1
60:         if d1 <= 0: raise ValueError, "no real value"
61:         d1 = sqrt(d1)
62:         x1 = (b1 + d1)/a1
63:         x2 = (b1 - d1)/a1
64:         x_y = lambda x: a-b*x
65:         x_z = lambda x: c-d*x
66:         v0cos = v0*cos(theta)
67:         v0sin = abs(v0) * sin(theta)
68:         r = br.r+br.v
69:         return [Branch(r, v0cos+v0sin*vp)            \
70:                 for vp in [v1, make_vector(x1, x_y(x1), x_z(x1)), make_vector(x2, x_y(x2), x_z(x2))]]
71:
72:     def out_data(i, ls):
73:         f = file('tree%d.dat' % i, 'w')
74:         f.write( '#x y z\n#rep: %d\n' % i)
75:         f.write('\n\n'.join(['%s\n%s\n' % (repr(b.r)[1:-1], repr(b.r + b.v)[1:-1]) for b in ls]))
76:         f.close()
77:
78:
79:     class Branch:
80:         def __init__(self, r, v):
81:             self.r = r
82:             self.v = v
83:
84:     if __name__=='__main__':
85:         ls0 = [Branch(make_vector(0,0,0), make_vector(0,0,1))]
86:         ls1 = []
87:         out_data(0, ls0)
88:         for rep in range(REP):
89:             for b in ls0:              # make branches from those produced at the last turn
90:                 ls1.extend(make_branch(b, BR, THETA, randint(0,6283) * 0.001))
91:             out_data(rep+1, ls1)
92:             ls0, ls1 =ls1, []
tree0.dat -- tree7.dat が生成するので、それを gnuplot で描かせると図1のようになります。 枝をだんだん細くし、最後 (tree8.dat) を緑色で描くと本物らしくなります。 gnuplot に与えるコマンドファイル tree.plt はこんな感じです。
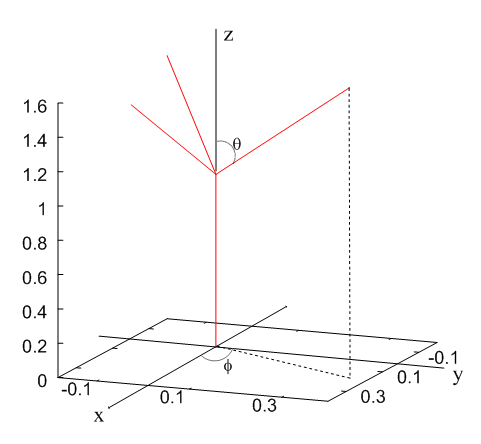
  v0*vp = 0
  v1*vp = -0.5
  abs(vp) = 1.0
から求まります。
vector.py と tree.py は付録につけておきましたので 暇なとき遊んでみてください。
|
HOME |
書き込む |